Happy Monday! I have some good things to share with you this week. Thank you so much to The Teaching Tribune, 4th Grade Frolics & My Pinterventures for hosting these wondful linkies!!

This week on Monday Meet Up, we are sharing three things we are thankful for! I am thankful for so very much that it was hard to pick just three. Since I seem to always slip in pics and info about my amazing fur babies, I left them off this form but had to add them at the bottom!! :)


(Collage made at Pizap.com - love this site for making collages and fun edits to my pics)


Blog Signature

I have been blogging for almost a year and I love to see the
super cute signatures at the end of blog posts and decided I needed one too!!! I
am by NO means a pro at code or blog design. I have been working all summer on
creating my new blog design and would like to share with you some of the things
I have learned in the process. Any programs/websites mentioned are what I used.
There may be many different programs you can use, but being a novice, these are
the ones I know about. Please feel free to share any other programs or ideas
you have in the comments section. I am always learning!
Create your signature using PicMonkey
* Go to PicMonkey.com
*Click
Design

*Click Open
I have a saved “PicMonkey
Starter” image. If you don’t already have one
follow these
directions to white wash a picture for your starter (picture below):
1. Open
any picture in PicMonkey
2. Click the Overlay button
3. Cover picture entirely and change
the color to #FFFFFF (pure white)
4. Merge
the overlay to the image
5. Save
the image as you “PicMonkey Starter”

*Crop your image to 200 pixels x 70 pixels
* Create Your
Design
What
I Did:
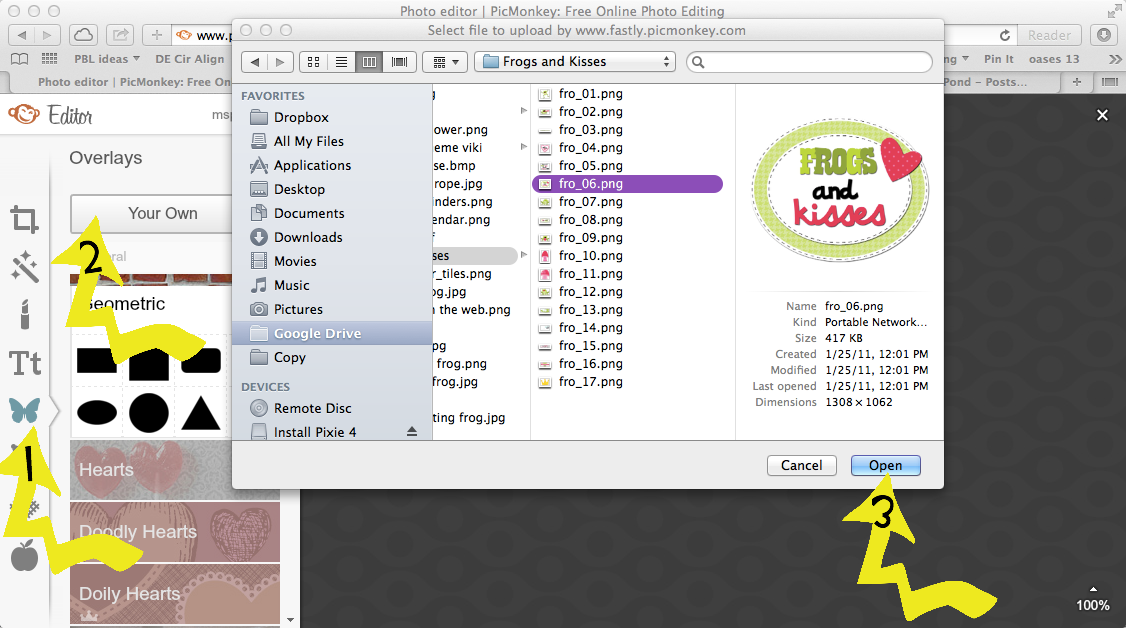
I had a piece of clipart from
Letter Delights I know I wanted to use. I added it by clicking Overlay ----
Your Own and choose your file.
I also had a font from Lettering
Delights that I wanted to use for my name so I typed my name in PowerPoint and
then saved the image as a picture to my computer. Be sure to select the image,
right click, and then choose “save a picture”.

I added my signature by clicking Overlay ---- Your Own
Afterwards I realized I could have used my fonts straight from PicMonkey!!!! (Told you I was new to all of this and still learning!)

*Save the completed image to your computer as a PNG file.


Upload your image to Photobucket.com

Copy the DIRECT link and add it to the code below in the highlighted portion. Be sure to only change the highlighted portion!!
<img class="left" alt="post signature" src="YOUR-IMAGE-URL">
My
code looks sort of like this:
<img
class="left" alt="post signature"
src="http://i1356.photobucket.com/albums/q734/myaccount/blogsignature_####.png">
If you
want this image to be centered under your post, add center tags:
<center><img
class="left" alt="post signature" src="YOUR-IMAGE-URL"><center>
To add your signature to Blogger:
Login to
your Blogger account

1. Click
Settings
2. Click
Posts & Comments
3. Click
Post Template &
4. Click
Save Settings
Now don’t
freak out, like I did, when you don’t see the signature on your blog right away.
It will not show up on past posts but will show up on any posts from now on. Next time you click "New Post" you should see your signature!!

I hope
this helped!!!! If you use this to add a signature to your blog, please let me
know. I would love to see your work!
**Warning "Squirrel" Momment**
Mac users, did you know you can get a screen shot by clicking command + shift + 4 together and then let go. When you let go, drag and highlight the area you want to capture. When you let go of the mouse, you will hear a shutter click sound. Your screen shot will be saved on your desktop!

 I have seen these super cute signs in many different formats and knew I just had to have one. I made my board with a lot of trial and error and things I had on hand. I designed and cut my words and cards using my Silhouette Cameo. The actual board was given to me a while back by my teacher neighbor. I hot glued the words on the board, hot glued the frog onto a clothes pin and the clothes pin onto the board. I punched holes in the top of the cards and put them on a ring. I then had to put that ring on another ring so that the cards would hang straight. I wish I had pictures to show you but my board is at school packed away for the summer. I am sure there is an easier way to hang the cards but that was what I came up with at the time.


12 oz bag of Tinkyada's Brown Rice Pasta Vegetable Spirals (gluten free)
**Squirrel** Be sure to rinse the noodle completely with cold water. It stops the cooking process so your noodle don't end of tasting gummy!
1 Can black beans, drained and rinsed
1 small bag of frozen corn
1/2 cup (ish) of chopped bell pepper (I used frozen since that was all I had on hand)
1/2 sweet Videla onion chopped (or onion of your choice, you could even use frozen)
1 can diced tomatoes, drained
OR 1 can of Rotel, drained (I only had 1/2 a can of diced tomatoes, so that is what I used!)
1/2 of a bottle of Newman's Own Family Recipe Italian Dressing (the dressing is KEY!)
Mix all of this together and refrigerate for at least 2 hours. I STRONGLY suggest that you let the pasta sit overnight. The first time I ate some of the pasta it had been in the refrigerator for about 3 hours and it was just ok. The next day I had the pasta salad for lunch and it was so much better. I like my pasta salad very "wet" so I add more dressing each time I serve the pasta but that is totally up to you!
You can follow my Gluten &/or Dairy Free Pinterest Board {here}.


 Who doesn't LOVE crockpot meals?! I especially love meals that can be freezer meals and then directly put into the crockpot still frozen since I can never seem to remember to thaw things out ahead of time. Last week, we tried this crockpot fajita recipe, and it was relish! It will be in our regular line up from now on!
I found the original recipe {here} on Pinterest!
My tweaked version:
1 1/2 lb flank steak
1 1/2 tsp chili powder
2 tsp cumin
1/2 tsp paprika
1/2 tsp salt (I just used a "good pinch".)
1/4 tsp black pepper (I just did a few twist of the grinder.)
3 Tbsp soy sauce
1 7oz can of green chilies
4 cloves of garlic - minced (I used 4 tsp of minced garlic from a jar since I did not have any fresh)
1 Red, 1 Yellow, and 1 Green sliced bell pepper
1 lg onion sliced (I used Videla sweet onion - use what you like!)
Cook on high in crockpot for 5-6 hours
Serve with your favorites: Salsa, sour cream, tomatillo sauce, etc. and Mexican rice (I used a box of Goya Mexican rice - it was delish!!!)
Next time I am thinking of adding portobella mushrooms and chicken in the crockpot, maybe even some sautéed shrimp on top!
You can follow my What's Cookin' Pinterest Board {here}.

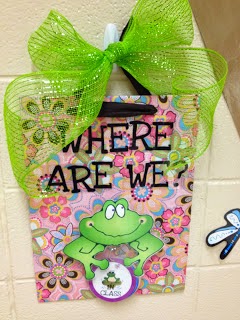
Where Are We?
I have seen these super cute signs in many different formats and knew I just had to have one. I made my board with a lot of trial and error and things I had on hand. I designed and cut my words and cards using my Silhouette Cameo. The actual board was given to me a while back by my teacher neighbor. I hot glued the words on the board, hot glued the frog onto a clothes pin and the clothes pin onto the board. I punched holes in the top of the cards and put them on a ring. I then had to put that ring on another ring so that the cards would hang straight. I wish I had pictures to show you but my board is at school packed away for the summer. I am sure there is an easier way to hang the cards but that was what I came up with at the time.
After learning to use PicMonkey.com and collecting a ton of new clipart I decided to re-do my cards. I now need to print, cut out, and laminate my self a new set of cards!! Click {here} to get your copy or wait and check back tomorrow for a Two for Tuesday deal!
Black Bean & Corn Pasta Salad
This pasta salad was inspired by a recipe I saw on Pinterest. I tweaked it just a little and now it is a new favorite go to summer lunch!
12 oz bag of Tinkyada's Brown Rice Pasta Vegetable Spirals (gluten free)
**Squirrel** Be sure to rinse the noodle completely with cold water. It stops the cooking process so your noodle don't end of tasting gummy!
1 Can black beans, drained and rinsed
1 small bag of frozen corn
1/2 cup (ish) of chopped bell pepper (I used frozen since that was all I had on hand)
1/2 sweet Videla onion chopped (or onion of your choice, you could even use frozen)
1 can diced tomatoes, drained
OR 1 can of Rotel, drained (I only had 1/2 a can of diced tomatoes, so that is what I used!)
1/2 of a bottle of Newman's Own Family Recipe Italian Dressing (the dressing is KEY!)
Mix all of this together and refrigerate for at least 2 hours. I STRONGLY suggest that you let the pasta sit overnight. The first time I ate some of the pasta it had been in the refrigerator for about 3 hours and it was just ok. The next day I had the pasta salad for lunch and it was so much better. I like my pasta salad very "wet" so I add more dressing each time I serve the pasta but that is totally up to you!
You can follow my Gluten &/or Dairy Free Pinterest Board {here}.
From Freezer to Crockpot!
FAJITAS!!!
I found the original recipe {here} on Pinterest!
My tweaked version:
1 1/2 lb flank steak
1 1/2 tsp chili powder
2 tsp cumin
1/2 tsp paprika
1/2 tsp salt (I just used a "good pinch".)
1/4 tsp black pepper (I just did a few twist of the grinder.)
3 Tbsp soy sauce
1 7oz can of green chilies
4 cloves of garlic - minced (I used 4 tsp of minced garlic from a jar since I did not have any fresh)
1 Red, 1 Yellow, and 1 Green sliced bell pepper
1 lg onion sliced (I used Videla sweet onion - use what you like!)
Cook on high in crockpot for 5-6 hours
Serve with your favorites: Salsa, sour cream, tomatillo sauce, etc. and Mexican rice (I used a box of Goya Mexican rice - it was delish!!!)
Next time I am thinking of adding portobella mushrooms and chicken in the crockpot, maybe even some sautéed shrimp on top!
You can follow my What's Cookin' Pinterest Board {here}.
What digital design secrets do you have to share? What have you made this summer? What are some of your go to summer recipes? Share in the comments and then link up with 4th Grade Frolics & My Pinterventures!